Pruning
Lessons The Literature Did Not Teach Me
Abstract: This paper presents practical lessons that I learned while preparing, conducting, and reviewing a significant pruning project at Colorado Christian University (CCU) between 2018 and 2024. I will first share some details about CCU and its library collection, provide a definition of “pruning,” and then share practical lessons I learned in the past few years that I did not see discussed while reviewing publications dealing with library pruning. These lessons learned are about how to better prepare for such a project, how to formulate evaluation criteria, how to use the library’s integrated library system and online public access catalog; they also concern workflow, better communication, post-project lessons (and potential future plans), and what should not be repeated by anybody: foolish lessons.
Introduction
Collection evaluation and pruning are standard practices among libraries. One might wonder how this topic applies more specifically to theological libraries and librarians. It is probably fair to say that theological librarians and libraries are often reluctant to prune their collections for at least two reasons: a) theological resources usually have a much longer shelf-life than resources in other subject matters; and b) theological libraries often lack adequate staffing, which discourages large-scale evaluation and pruning projects. This paper is borne out of such a context and will give insights into how you can complete such a project successfully.
Background of Colorado Christian University
Colorado Christian University is a non-denominational evangelical school that traces its history to the founding of the Denver Bible Institute in 1914. Now located in Lakewood, Colorado, CCU has a student FTE of over 7,200 divided between the College of Undergraduate Studies (on-campus students), the College of Adults and Graduate Studies (primarily online students), and the CCU Academy (online dual credit, dual enrollment).
The Clifton Fowler Library, named after the founder of the Denver Bible Institute, has four full-time library faculty (Director of Library Services, Instruction & Outreach Librarian, Web Technologies Librarian, and Technical Services Librarian), and one and a half full-time library staff (Library Service Coordinator, Library Associate). As of April 2024, the Library’s collection includes more than 28,000 physical volumes, 740,000 electronic volumes, 19,000 audio books, 103,000 audio recordings, and 68,000 video recordings; the audio books, audio and video recordings are primarily online resources.
In 2018, the librarians at CCU made two significant decisions: first, we shifted primary funding for resources from print to electronic since the majority of CCU’s students are not able to access physical resources. Second, the physical collection needed a thorough evaluation because (a) many of these resources were either outdated and/or not used, and (b) the building that housed the library would sooner or later be torn down and rebuilt. Removing unnecessary titles from the collection would reduce the work of moving the collection to a temporary location and back into the new building. Thus, I started preparations for the evaluation of the collections in 2018 and continued the project (with interruptions) until the spring of 2024.
Definitions
The library literature provides several options to describe the removal of resources from a collection. Common terms include weeding, retiring, deselecting, or deaccessioning. All these terms describe the same general practice: resources are moved from a collection of the library to (a) a less prominent collection (e.g., from Reference to Circulation), (b) to a less prominent location (e.g., to an off-campus location), or (c) to be sold, gifted, recycled, or exchanged for another resource or credit.
While those may be the most common terms used for removing titles from a library collection, deselecting and deaccessioning are technical and will not be clear to those outside the library. Retiring is a good term to describe this kind of project, but most people associate retiring with something other than libraries. I believe that weeding is a poor choice of words, for it implies that the resource was always of inferior quality, which is (hopefully) inaccurate for most titles. Further, if one takes the gardening comparison further, one might conclude that these poor-quality resources multiply on their own. I therefore prefer to speak of pruning the collection. The term, I believe, accurately describes the removal of a branch (book) that is no longer useful or hinders the growth of the plant (i.e., hinders the full usefulness of the collection), while at the same time indicating that the branch (book) was once productive and useful.
The Lessons Learned
It is not the purpose of this article to discuss reasons why librarians do and do not prune, pruning criteria such as MUSTIE, or how to plan for such a project. There is an abundance of literature that discusses these points at length. Neither will I discuss CCU’s specific reasons for evaluating and pruning the collection, since such reasons differ according to context. Instead, this article will discuss the lessons I learned preparing, conducting, and completing a pruning project—lessons that I had not learned even after consulting more than twenty-five resources discussing such projects in preparation for this one.
Project Preparation Lessons
Gather Statistics
Lesson: Gather as many meaningful statistics as possible.
It is important to gather significant statistics about the collection before evaluating the first title. Since different libraries may need different statistics, it is important to gather detailed information to draw meaningful conclusions at the end of the project. For this project, I gathered the number of resources in every class and sub-class of the Library of Congress Classification schedule. This information allowed me to not only have a good overview of the library’s current holdings, but by using the same parameters after the project, the data allowed me to see which area of the collection was most affected by the evaluation.
Save the Search Queries
Lesson: Save all search queries you use to gather statistics at the beginning of the project so you can use identical queries at the end of the project.
As with the previous point: conduct the pre- and post-data collection using identical methods and parameters. The integrated library system (ILS) for the CCU Library is Sierra, and I made it a point to document the search and data export perimeters (in our case, a JSON search query) in my documentation. It makes no sense to compare data that was collected using different methods, for the data will likely reveal changes that make as much sense as this example illustrates: “At the beginning of the sale, we had 100 apples, and at the end of the sale we had 5 pounds of apples left.”
Further, if the pruning project overlaps with a library’s migration to a new ILS, it is probably best to run a first pre-project report before the evaluation begins, run a first post-project report the day before the implementation, run a second pre-project report on the first day after the implementation, and a second post-project report once the project is completed. This will help secure the integrity of the data.
Make Review of the Project Part of the Project
Lesson: Plan to review the project while it is in progress and after it is completed.
A project review can be an invaluable resource for future projects. It took me less than a week to realize that I was learning new things about the project every day, and I decided to start taking notes about what was and what was not going well. This also led me to sit down with colleagues to learn what lessons they were learning. This, in turn, led to changes in the workflow and clarifications in the documentation and instructions. Prior to any project, create a dedicated blank document to record lessons you have learned that day or week, set up appointments with colleagues one week into the project to gain insights, and implement the feedback you receive.
Evaluation Criteria Lessons
Create Policies for “Special Books”
Lesson: Try to think of titles that may need more or less attention in the evaluation process.
One insight I had very quickly was that I had not previously considered certain titles that were in the library’s collection. The type of “special books” will differ from library to library, but for an academic library such as CCU’s, I decided that we either keep or prune certain series based on their academic quality. For example, I removed titles that were part of “Time-Life Books” or “Barnes & Noble” series. However, there were other series that were not as easy to decide. I ultimately developed the policy to retain those volumes of academic series that showed a history of usage while pruning those volumes of the same series that showed little to no usage. I made exceptions when we had a complete or near complete run of a series.
I encountered a similar problem with sets. These included Bible commentary sets as well as sets such as the Scribner Writers Series. When I encountered such sets, I developed the policy to keep all volumes if (a) we had a complete or near complete set, and (b) some volumes of the set had a history of usage. On the other hand, if the set was very incomplete and it was unlikely that CCU would add the missing volumes, I pruned those volumes that had not shown usage.
Create Evaluation Policies Based on Keywords in Title
Lesson: Depending on the type of titles you evaluate, think of keywords in titles that may help you accelerate your evaluation process.
Within a few months of starting the project, I came across an article that helped me in my evaluation process. Arbeeny and Chittenden (2014) argued that many titles can be evaluated at high speed by merely looking at their titles: any older publications that included words such as modern, today, new, contemporary, emergent, or current are most likely out of date and can be pruned without much additional evaluation.
Workflow Lessons
The workflow for this project was likely very similar to projects conducted by others: (1) I used the ILS to create various lists of titles that were to be evaluated and gave those to the student employees; (2) the student employees then pulled those books and placed them in my office on shelves and book carts; (3) I evaluated the titles and decided if a title was to be kept or pruned; (4) I removed all titles from the ILS and OCLC holdings while the students reshelved titles that we kept; (5) I kept all completed pages of titles that I evaluated in my office for record-keeping and to answer potential questions.
Pay Attention to the Pilot Project
Lesson: Conduct a pilot project to identify problems and take the time to implement its lessons.
I purposefully created a pilot project that involved all individuals involved: the student employees and their supervisor, some colleagues, and myself. The pilot project did help me clarify some of the instructions I had given in writing to the student employees; however, there were other lessons that I did not implement because I was too eager to get the project started. So, while I learned many lessons, I did not implement enough changes based on those lessons. This would cost me time and energy (as some of the following points will show).
Anticipate Delays
Lesson: Be liberal in your project timeline in case there are unforeseen delays.
At the beginning of the project, I estimated that I could evaluate approximately 300 titles every day. As I gathered data from months of evaluation, I had completed only about 150 titles per day when I actively worked on the project.
There were several bottlenecks that I had not considered in my initial estimation. One was that student employees were sometimes not available or were busy with other projects. Computer, internet, ILS problems, other responsibilities, and change of locations (most of the collection moved to the temporary off-campus location in the middle of the project) all further slowed the project’s pace. Evaluating a collection carefully takes time, and you should therefore be liberal in how much time you plan to take to complete it.
Evaluate Using Your Hands
Lesson: Use more than one sense to gauge the value of a title you are evaluating.
Usage statistics are one of the most common and important indicators of a title’s worth in a library’s collection. When I created the lists of titles to be evaluated, I included two indicators: the number of total checkouts and the last time a title had been checked in. However, there is a real problem evaluating titles purely by looking at statistics in a spreadsheet: as I looked at the hundreds of lines of resources, the titles and authors start to blur into a mass of letters and numbers.
Right from the start of the project, I was committed to touching every resource I was evaluating. While this slows down the project, it allowed me to evaluate each title individually, look at the title and author in larger (than the spreadsheet) font, read the author’s credentials, the endorsements, investigate if a new edition was available, and evaluate the physical condition of the resource. Even if the resource appears not to be useful anymore, it once cost the institution or a donor money, and it is worth the investment of your time to give it a fair and careful evaluation.
Sort Evaluated Books Systematically
Lesson 1: Create categories for evaluated titles and sort them in a way that makes sense (to you).
I found it helpful to evaluate a title and then place it within a certain space on my desk and in a certain way. Thus, all titles that I needed to scan after the evaluation was completed for the day were placed on my desk with the barcode facing up. Titles that would go into the library’s book sale were placed horizontally with the barcode up and facing away from me. Titles that we shipped to a used book vendor were placed vertically with the barcode facing up. Books that needed to be reshelved were placed horizontally with the barcode down. Books that needed to be checked-in and checked-out again (to create usage; more about that below) were placed horizontally with the barcode facing up and towards me, etc. Image 1 shows how I arranged the books on my desk; note how I placed the books and the barcodes.

Lesson 2: Place evaluated titles in places that make it easy on you and your back.
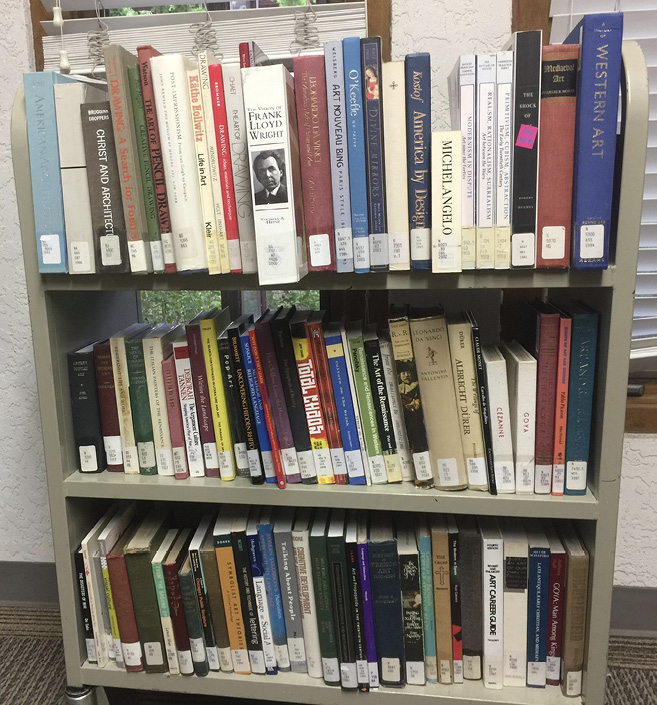
Not all books are created equal: some are heavier than others. Pruned books no longer needed to be in a certain order, and I therefore made it a habit to place the heaviest titles on the top shelf of a cart, the shelf that was easiest for me to reach. Image 2 shows that all smaller and lighter books are on the bottom two shelves, while all heavier books are on the top shelf. This practice does not mean that only heavy books go on the top shelf—it means that all heavy books are on that easy-to-reach shelf, while smaller books fill out the empty space.
Protect Your Shipping Supplies
Lesson 1: Do not let shipping supplies disappear for non-library business.
For this project, the CCU library used Better World Books (BWB) to dispose of all titles that we pruned and did not sell in the library’s book sale. BWB provides empty shipping boxes (usually forty at a time) and organizes the shipping of those boxes. The problem we encountered was that boxes started to disappear; library employees used them to move or store both personal and library materials. Thus, the project manager should provide clear communication that boxes are not to be used for any other purposes (and that they are not the library’s property). Obviously, the same is true for all other shipping supplies as well.
Lesson 2: Always have enough boxes and other shipping supplies at hand.
We quickly made it a habit that when we started the last set of 40 BWB boxes, we ordered another set, which would take one to two weeks to arrive. This way, we always had enough boxes available to box up pruned titles. We applied the same principle to other supplies such as packing tape, shrink wrap (for preparing pallets of boxes), permanent markers, etc. Unless the project nears its end, ensure that you always have more than enough supplies at hand.
Take Regular Breaks from the Project
Lesson: Make sure that you do not evaluate books for an entire day without breaks.
I previously mentioned that you should take your time evaluating each book by using more than one sense, i.e., do not merely look at data on spreadsheets, but touch the physical book. This lesson is not merely a reminder of this key point. Rather, you must (purposefully) plan for time away from the project.
There is a real chance that you will catch the bug I call “evaluation-monotony.” Just as the data on a spreadsheet can easily become overwhelming and you cannot see the trees because of the forest, looking at 100-plus books without any interruption can easily cause you to lose concentration as books start to look alike, which will cause you to make errors in your evaluation. Plan ahead and balance your workday with other (smaller) projects that interrupt the evaluation. You might want to walk around the library and check if patrons need help, eat lunch, or talk to a colleague for a few minutes about this or another project. Every person will work differently and will reach the point of evaluation-monotony at different times. Knowing yourself and planning ahead can help.
Ensure That the Item Is Clear to Be Withdrawn
Lesson: Check the status of the title before you remove it from the collection.
If a title has not seen usage for many years, one can assume that it is no longer useful in the eyes of the library’s users. However, that assumption is just that … an assumption. Library patrons may not have used it because the online public access catalog (OPAC) lists the item as lost, checked out, on the repair shelf, out for binding, etc. It is possible the student employee pulled the title from the shelf for evaluation two days ago, and yesterday a patron placed a hold on the title. Before you withdraw the title from the library’s ILS, before you delete your holdings record from OCLC, before you cross out the barcode, it is imperative that you check the status of the resource to ensure that it is clear to be removed from the collection.
Anticipate Technical, Software, or Power Problems
Lesson: Be prepared when unforeseen problems delay the evaluation project.
First, save your files and records consistently, constantly, and to a safe place—your computer’s local hard drive is not a safe place. Save those files to a network or to the cloud and do so every time you take a short break, go to the bathroom, or eat lunch. Power or network outages usually happen at (what we perceive to be) the worst possible time. Reduce the risk of losing data and/or reduce the amount of data you might lose by backing up relevant information and data often.
ILS Lessons
Libraries use a variety of integrated library systems, and obviously each will have its strengths and weaknesses. It is up to the librarian to learn which weaknesses to bypass or overcome. At the time of this project, the CCU Library was using III Sierra.
Determine the Data Needed for Good Record-Keeping
Lesson: Before beginning the project, ensure that you know all the data you wish to collect to produce records of your pruning.
I like keeping detailed records. I find comfort in the fact that I know which titles I have added or removed at what point of time and for what reasons. As librarians, we are responsible for justifying our decisions to our funding agencies, and data can make that task easier.
When I started the project, I included the following data in my record-keeping of pruned titles:
- Date Pruned
- Title of Work
- Author(s) or Editor(s)
- ISBN or ISSN
- Publication Date
- Call Number
- Internal Note
- Status (if title was considered lost, checked out, etc.)
- Date of Last Check-in
- Total Number of Checkouts
- Barcode
As I progressed, I also included the OCLC number/BIBID in my records.
Produce Clean Data of Pruned Titles
Lesson: Use the Pilot Project to investigate and overcome any data export problems of your ILS.
I consistently encountered problems exporting data from Sierra into a spreadsheet. While advanced users may have solutions, I was never able to overcome the fact that data spilled into multiple columns, thus creating cleanup work for me. This was particularly true for the title column, which (see image 3) spilled data into the next one or two columns. I should have noticed this problem during the Pilot Project, and I should have tried to find ways to solve this problem prior to beginning the main part of the project. Since the title caused the most problems, I could have (and ultimately did) shift the order of the exports so that the title information was in the final column. This allowed for much cleaner data in the rest of the spreadsheet. I could then re-arrange the title data into the desirable column without causing additional work.

Lesson: You will come across titles you think are still valuable to the collection, i.e., titles that should receive a “second chance.” In those situations, you can check-out and check-in the title to create artificial circulation, i.e., the title is protected from being pruned in the next few years.
Even though usage statistics should never be the sole data point for collection management decisions, usage remains a key data point in library evaluations. Sometimes patrons may not have used a resource for years, and yet the title is still a standard in its field or is still helpful in some circumstances. In many cases, such titles should remain in the collection for a few more years to give them another opportunity to be used by library patrons. I created an artificial circulation by checking the title out to myself and immediately back in. The purpose of this was to remove the title from evaluation lists for the next few years without protecting it for an indefinite period, i.e., if the title does not receive additional usage in the future, we will likely prune it during a future collection evaluation.
Create Note Fields in Item Records
Lesson: If your ILS allows, you should create notes in the item records that inform future evaluation/pruning efforts.
The CCU Library has a longstanding tradition of adding notes to item records to identify titles that were requested by CCU professors or administrators. I have a template for that note, which includes the faculty member’s name and school. At any future evaluation, the note will help librarians gain valuable information why the title was added in the first place and will likely delay its removal if the professor is still at the university.
Other notes may be equally helpful. Librarians evaluating the collection in the future can gain good insight if the item record indicates that the title is a “classic” in the field, or if librarians add a note that the title should remain in the collection until a certain year (e.g., “Do not prune until 2030.”).
OPAC Lessons: Find Shortcuts Whenever Possible
There are many different OPAC/discovery systems available to libraries, and each will have its own strengths and weaknesses. Librarians must learn to use any strengths to their advantage and alleviate any weaknesses to the best of their abilities. CCU uses Pika (www.ccu.edu/library), a system based on VuFind.
Lesson: Evaluate your workflow to see if shortcuts are available via the OPAC, browser, etc.
My workflow included scanning every item’s barcode. Most of the time, I also clicked on the hyperlink of every subject heading to investigate our other holdings in the title’s subject area. Over time, I realized that I could significantly increase the speed of evaluation by implementing three minor changes:
First, I would not click on a subject hyperlink and wait for a new page to load. Instead, I would open a new tab (“Open Link in New Tab” in Mozilla Firefox), so that I could click on additional subject links while this and other tabs were loading.
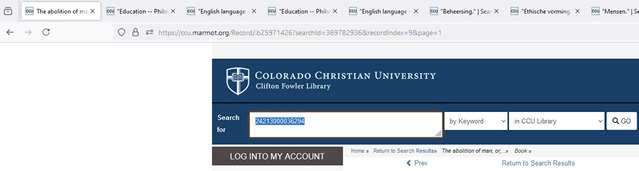
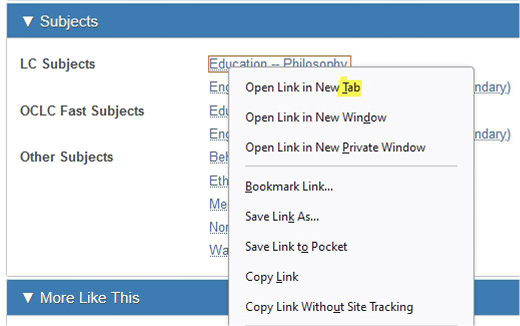
Second, I realized that instead of right-clicking on the hyperlink link with the mouse button and then using another mouse-click on “Open Link in New Tab,” I could mouse right-click on the subject hyperlink and then use the “T” key on the keyboard (underlined and highlighted in the Image 4) to execute the same command to “Open Link in New Tab.” While Chrome does not have this open, Firefox does!
Third, after I had opened the tabs for the title’s subject(s), I had to scroll to the top of the page to access those tabs. I made it a habit to select/highlight barcode in the search field when I reached the top of the page and then investigate the recently opened tabs. Once I closed the additional tabs, the search field would already be selected, i.e., all I had to do is scan the next book’s barcode into the search field.
The key is to look for and implement these kinds of shortcuts as they are available in your context and fit them into your workflow.
Communication Lessons
Look and Ask for Treasures
Lesson: If you need something, ask (the right people) for it.
We have all heard the saying, “One person’s trash is another person’s treasure.” The CCU librarians decided to ship pruned titles to BWB on pallets. However, the only place we could find them was behind the cafeteria. So, I went to the director of the cafeteria and asked if I could periodically take one or two. He was delighted to get rid of them. All it took was to ask the right person the right question. Ask for those “treasures;” the worst thing that can happen is that your request is denied.
Be the Squeaky Wheel
Lesson: If you need something and the initial answer was not the one you needed, keep asking.
Since the CCU’s evaluation process took approximately six years, it is not surprising that things changed. The most notable change was that most books were moved to an off-campus facility. This one change entailed a lot of smaller changes: there were fewer book carts to place/store books on; student employees were usually not available; and there was no internet connection at the facility.
One way to respond to these changes was to just give up and call the project “completed.” However, when there is a will, there usually is a way. Our initial request to install internet access was denied because it would take too much time to get it installed. For many months, I used my cell phone’s hotspot to connect to both our ILS and OPAC, which was problematic on most days. After repeated attempts, CCU’s IT department finally installed internet. My argument was quite simple: “I cannot do my work properly without proper internet access.” If it is a reasonable work-related request, do not give up; keep asking … i.e., squeaking.
Keep Stakeholders Informed
Lesson: Communication must not be a one-time deal; keep people informed as the project progresses.
It may be true that librarians often complete projects without anyone outside of the library noticing their efforts. However, when evaluating and pruning a collection, people tend to start paying attention. It is therefore important to keep the administration, faculty, colleagues, staff, students, and other stakeholders informed about the project before you start it.
Remember that communication channels can break down easily. In the case of CCU, the Dean of the Library informed the administration and other deans about the upcoming project; the deans were supposed to inform their respective faculty. This, however, did not always happen, and some faculty needed additional information. On the one hand, I was thrilled for faculty to come to my office and ask good questions; on the other hand, I was disappointed that some faculty more or less openly accused me of weakening the collection. Librarians have a responsibility to properly inform their library’s stakeholders. Different libraries may find different channels to communicate; some may find a weekly or monthly newsletter useful; others may design a LibGuide or a Google Doc/Google Sheet, etc.
Patiently Instruct Those Who Work with You
Lesson: Supply clear instructions and be willing to revise them to provide even greater clarity.
No librarian would purposefully provide unclear instructions to their colleagues or student employees. However, just because instructions seem clear to me does not mean that they are clear to others. Amazingly, my “perfect” instructions left room for many types of errors. Student employees regularly did not place books in proper order, slowing down the evaluation process. (It is easier to evaluate one hundred books on C.S. Lewis if I evaluate them one after another than having to evaluate them one at a time spread throughout thousands of other titles.) They also placed the books in several ways on the shelves: correctly with the spine facing out, but also upside down or the spine facing the wall. BWB boxes disappeared from the library, and those the student employees boxed with library books were often not filled well. Some student employees were not aware that this was an ongoing project and returned to their regular duties after a few weeks.
Besides updating the written instructions for everybody, I started to have one-on-one meetings with colleagues and student employees. This was not always easy since my schedule did not overlap with all of them. Again, the Pilot Project should have revealed these weaknesses. However, there are additional solutions: librarians can communicate with individuals they usually do not see via a Wiki, Google Doc, or LibGuide.
Signage
Lessons: Make your signs clear—crystal clear!
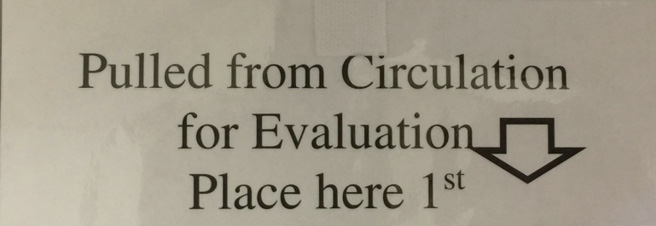
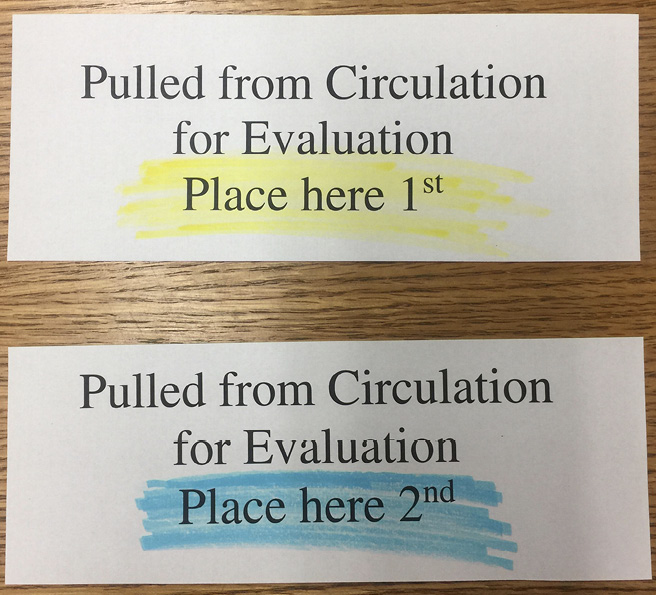
Within a week or two, I realized that my initial signs for student employees were not clear. One initial sign read, “Pulled from Circulation for Evaluation” (see image 6). However, this left students without any instructions as to which book cart or shelf was in what order—they pulled the books, placed them on a book cart, then pulled more books and placed them on a different cart.

Thus, I revised the signs to provide numerical order to the “book madness.” This way, students knew where to place books first, second, third, etc. (see image 7), and it allowed me to evaluate books in the order that they had been pulled from the shelves.
However, a little bit later it became clear that the signs were still not clear enough because students did not always pay close attention to the numbers on the signs—apart from a number and two small letters, they all looked the same. I therefore added some color to the sign, coloring first yellow, second blue, etc. (see image 8). From then on, the books were usually in order, which allowed me to work more efficiently.
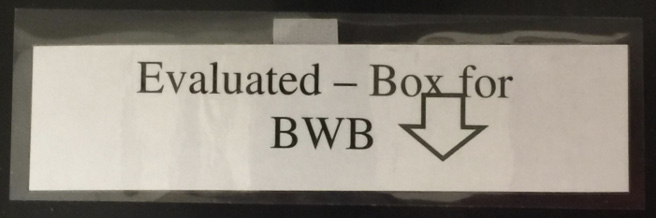
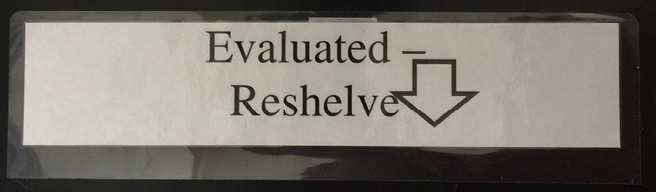
However, my “sign woes” were far from over. Images 9 and 10 show two quite different signs: the only similarities are a few words and two lines of text. Image 9 clearly indicates books that we needed to box for BWB, while image 10 instructs student employees to reshelve those books.
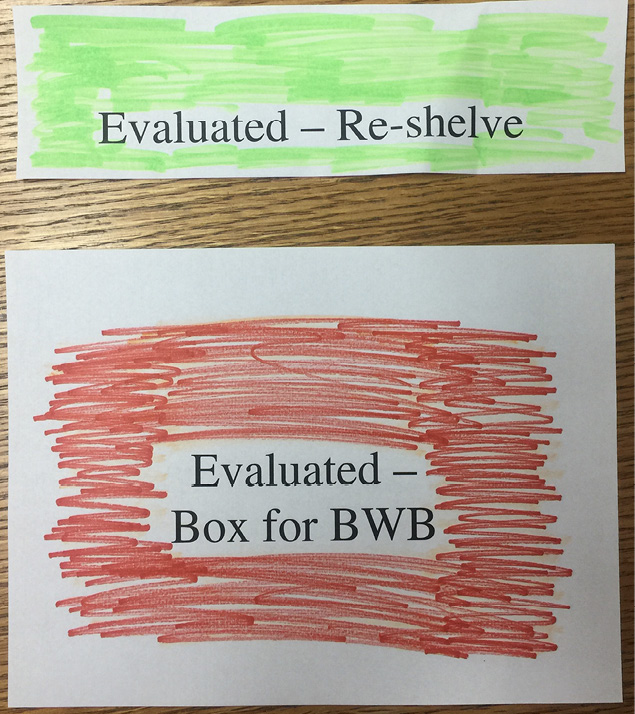
It turns out that these signs needed color—lots of color, and color that truly communicated the difference. I ended up coloring all “Re-shelve” signs in green and all “Box for BWB” signs red (see image 11) to minimize the possibility of errors.
Signs need to be clear, and they need to be crystal clear. Whatever we as project managers do, we must make sure that those individuals who work with us receive the clearest instructions possible. If our instructions and signage are not clear, we cannot blame anybody but ourselves if others make mistakes. Make the signs clear, place them where people can clearly see them, and place them in a way that does not foster confusion. Image 12 shows a book cart filled with books and what appears to be crystal clear signs. Well, they are clear if you are standing, and you are looking down onto the book cart. But imagine sitting on a chair: the angle is different, and it is much harder to see those signs. It so happened that one of the best student employees I ever had the pleasure of working with encountered such a cart and boxed all the books for BWB. The lesson is clear (pun intended): avoid confusion to the best of your ability.

Keep Documentation Updated
Lesson: As the project progresses and you make changes to the workflow, make sure you keep all instructions and procedure documentation updated.
It is easy to become so involved in a project that you forget to keep documentation current. A minor change here and an added step there will quickly cause confusion if the documentation is not current. Clear communication should not merely happen once but needs to be regular. Duplicate any changes in verbal instructions in written documentation.
Post-Project Lessons/Future Plans
Vendors to Consider
Lesson: Always investigate options for evaluation projects.
We used Better World Books as a vendor for all titles that we removed from the collection and did not sell in our library book sale. BWB does require libraries to send books regularly to keep their account active, but we were otherwise happy with them.
There are services such as OCLC’s Sustainable Collection Services/Greenglass that might be useful for some libraries. I also investigated www.DiscoverBooks.com.
Continuous Evaluation
Lesson: Collection management involves continuous evaluation of the collection.
A library’s collection is never “done.” Books get published daily, and libraries add new titles that fit their collection management policy on a regular basis. At the same time, titles grow old and out of date, and librarians need to evaluate the collection regularly to remove titles that have served their purpose and at the same time discover weak spots in the collection. I have developed an evaluation schedule that requires me to evaluate certain sections of the Library of Congress Classifications every year, which means that the whole collection is evaluated once every five years.
Evaluate Your Evaluation
Lesson: Evaluate your evaluation judgment by tracking interlibrary loan and purchase requests against the titles you pruned.
At the end of an evaluation project, if you have kept good records, you should have a lengthy list of titles you have pruned from the collection. Over the next one, three, five, or ten years, you can now compare that list to titles that your patrons request for purchase or through interlibrary loan (Ash 1963). How many titles have been requested that you previously pruned? If the number is low, you have evidence that your project was a success.
The Fool’s Lessons
We all make mistakes. However, there are some of us who may stand as a warning beacon for others not to make the same (or similar) mistakes. Consider this final portion of this paper such a beacon.
Be Careful with That “Delete” Button
Lesson: If there is no “undo,” be careful hitting that “delete” button too hastily.
Throughout the project, I often came across duplicate copies of titles. In many cases, I kept one copy in the collection, but pruned all additional copies. At the beginning of the project, I did not differentiate between all copies vs. some copies of a title. What was the result? No matter if I retained a copy of a title or not, I (initially) deleted all OCLC holdings … no matter if I had withdrawn all or merely duplicated copies from the ILS. In other words: in the initial stages of the project, I removed OCLC holdings for titles that were still in our collection. Once I discovered that mistake, I created a new space on my desk and ensured that I did not withdraw the OCLC holdings of titles of which we retained a copy.
Save Document Version 1, Save Version 2, Save Version 3, etc.
Lesson: If you make significant changes to a document, save it first, and then save the new document as new version.
One of the frustrations with spreadsheets is that they do not necessarily understand how to place Library of Congress call numbers in correct order. This causes frustration among those individuals who pull books from the collection and walk back and forth between shelves because BS 4 is listed on the spreadsheet between BS 3900 and BS 4100 (using imaginary call numbers). I attempted to alleviate this problem by removing the periods (“.”) in the call numbers. This caused more problems than it solved. For example: after the modification, BS 1171.2 appeared as BS 11712 on the spreadsheet, which the student employees now had to decipher: besides BS 1117.2 the call number could potentially also be BS 117.12. To my horror, I had made the change without saving the spreadsheet with a new name, and I had made the change the previous day. This meant that the original list of titles, as imperfect as it was, was now lost. Thus, before you make significant changes, save the file with a new file name, make the changes, and then evaluate if the changes had some unforeseen negative side-effects before proceeding.
Work Hard to Find Ways to Work Smart.
Lesson: Look for shortcuts yourself, but more importantly: reach out to colleagues to find ways to work more efficiently.
Some may interpret asking for help as a sign of weakness; others may see it as a sign of inexperience. However, librarians are known to cooperate, and I have yet to meet a librarian who is not willing to share tricks of the trade to make another librarian’s life easier.
For more than a year, I followed these steps to add a title to a list of items that I would then withdraw (Sierra uses the Create List function):
- I scanned the barcode of the title and waited for about two seconds for Sierra to respond.
- I clicked on “View Item Record” and waited for about two seconds for Sierra to respond.
- I clicked on “Add to List” and waited for about three seconds for Sierra to respond.
- I clicked on “Add Another Item” and waited for about three seconds for Sierra to respond.
- I repeated the process, sometimes 100 times a day!
One day I met with a colleague who had much more experience working with Sierra, and he showed me a Sierra search query (JSON) that would allow me to add as many barcodes as I wanted to a list. From beginning to end, the process took approximately two minutes to complete; compare that to ten seconds of waiting for each title!
If you are a Sierra user and wish to know how you can use the JSON to add barcodes to a Create List, please scan the QR code of Image 13.
The lesson is simple: ask colleagues near and far for help, for shortcuts, for tips and tricks of the trade. There is no need to work harder if there are ways to work smarter.
Conclusion
The evaluation and pruning project at Colorado Christian University was a success: in six years, we removed more than 30,000 titles that had seen little to no usage, and their removal did not weaken the collection in a meaningful way. The pruning eased the collection’s move into a temporary location. Three years later, an even smaller collection will move back onto the campus, making that move cheaper and less complicated.
Evaluating and pruning a collection may not be popular among librarians and library stakeholders, but it is necessary for providing library patrons with the best resources. One key to a successful project is to conduct it correctly, and I hope that this paper has given you insights into the negative lessons to avoid and the positive ones you can implement.
References
Arbeeny, Pamela, and Lloyd Chittenden. 2014. “An Ugly Weed: Innovative Deselection to Address a Shelf Space Crisis. Journal of Library Innovation 5 (1): 78–90. https://citeseerx.ist.psu.edu/document?repid=rep1&type=pdf&doi=35ca7d67994adcd535ca6658ecc6679b34afa04b
Ash, Lee. 1963. Yale’s Selective Book Retirement Program: Report of a Three-Year Project Directed by John H. Ottemiller, Associate University Librarian, under a Grant from the Council on Library Resources, Inc. Hamden: Archon Books. Retrieved from https://catalog.hathitrust.org/Record/001163847